
Mastering the art of making a blooming onion in an air fryer allows you to enjoy a restaurant-style appetizer from the comfort of your own kitchen. This method significantly reduces the oil intake compared to deep-frying while maintaining that sought-after crunch and savory flavor. By carefully selecting your produce and mastering the slicing technique, you can transform a simple vegetable into an impressive centerpiece for any gathering.
This process relies on precision and heat circulation to ensure the layers open up perfectly, resulting in a dish that looks as professional as it tastes. Let’s look at how to achieve those crispy, golden petals every single time.
Selecting and Preparing the Perfect Onion
The foundation of a successful dish starts with choosing the right produce. For this specific recipe, a large yellow onion is the gold standard because of its size, mild flavor profile, and structural integrity.
You want to pick an onion that is firm, heavy for its size, and free of any soft spots or bruises. The size matters immensely here; a larger bulb provides more surface area for the batter and ensures that the finished product has enough substance to hold its shape during the cooking process.
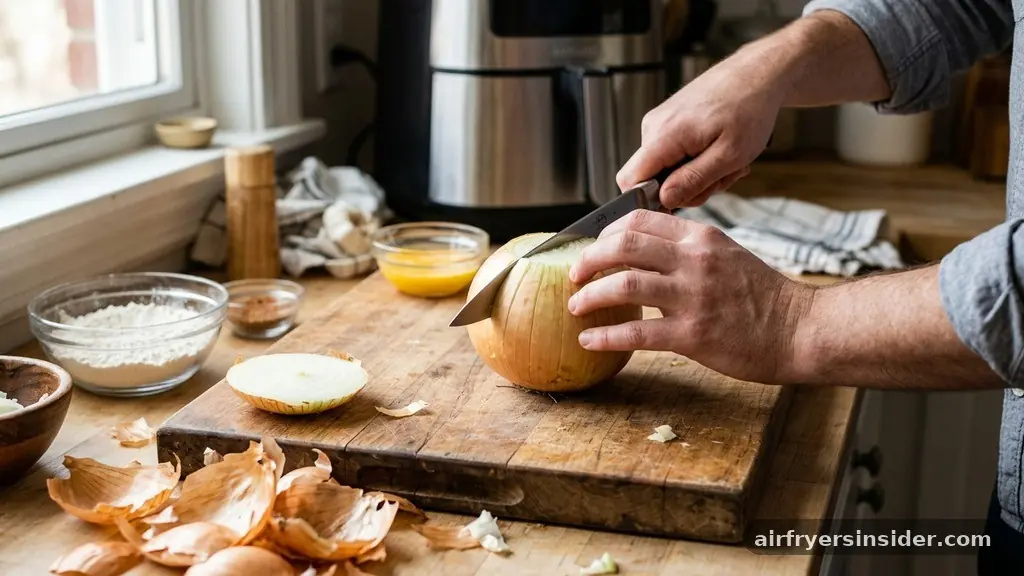
Once you have selected your onion, the preparation begins with the root end. You must leave the root intact, as it acts as the anchor that holds all the individual petals together. Slice off the top stem end to create a flat base, but be careful not to cut too deep into the root.
Peel away the papery outer skin, ensuring you remove all traces of dirt and debris. A clean, smooth surface allows the batter to adhere evenly, which is critical for achieving a uniform texture once the convection heat works its magic.
The Art of the Petal Cut
Creating the signature look requires a sharp chef’s knife and a bit of patience. Place the onion root-side up on your cutting board. Starting about half an inch from the root, cut downward toward the board, but stop just before you slice through the root itself.
You are aiming for a clean, vertical incision. Rotate the onion and repeat this process until you have sliced it into quarters, then divide each quarter into smaller, even sections.
If you find manual slicing difficult, a blooming onion cutter can provide uniform results every time. However, if you are using a knife, aim for sixteen distinct wedges to ensure the onion blooms fully. After making your cuts, flip the onion over and use a paring knife to gently perform the core removal.
By taking out a small circular section from the center, you provide the space necessary for the petals to spread outward once the heat hits them. This step is vital for the presentation, as it allows the onion to open like a flower rather than remaining a dense, tight clump.
Creating the Ideal Batter Texture
A multi-stage coating process is essential for building flavor and structure. Start with a buttermilk soak, which tenderizes the onion and provides a slightly tangy base for the seasonings to cling to. Let the onion sit in the buttermilk for at least twenty minutes.
While it soaks, prepare your dry dredging station. A mixture of all-purpose flour, paprika, garlic powder, onion powder, and cayenne pepper creates a savory, aromatic crust that balances the natural sweetness of the vegetable.
After the soak, gently shake off the excess liquid and move the onion to the flour mixture. Ensure every nook and cranny is coated, especially between the petals. Follow this with an egg wash—a simple mixture of beaten eggs and a splash of milk or water.
This acts as the glue for your final layer. For the exterior, panko breadcrumbs are highly recommended over standard breadcrumbs because their coarse texture provides superior crispiness. The combination of the flour dredging and the panko ensures a sturdy, crunchy shell that won’t slide off during the cooking cycle.
Optimizing the Air Fryer Environment
The air fryer basket must be prepared correctly to prevent sticking and ensure even airflow. Lightly coat the basket with a high-quality cooking spray or use an oil mister to apply a thin, even layer of oil to the onion itself.
This is the most important step for achieving that deep-fried aesthetic without the vat of oil. The convection heat inside the machine works by circulating hot air at high speeds, which requires a little bit of fat on the surface of the breading to turn the flour and panko into a deep, golden brown crust.
Arrange the onion in the center of the basket, making sure it isn’t touching the sides. If your onion is too large, it might obstruct the airflow, which leads to soggy spots. If you find your air fryer is smaller than your onion, you may need to trim the outer petals slightly.
Ensure there is enough space around the perimeter for the air to circulate underneath and around the sides. This movement is what dries out the surface of the batter, creating the crunch that defines this dish.
Temperature and Timing Considerations
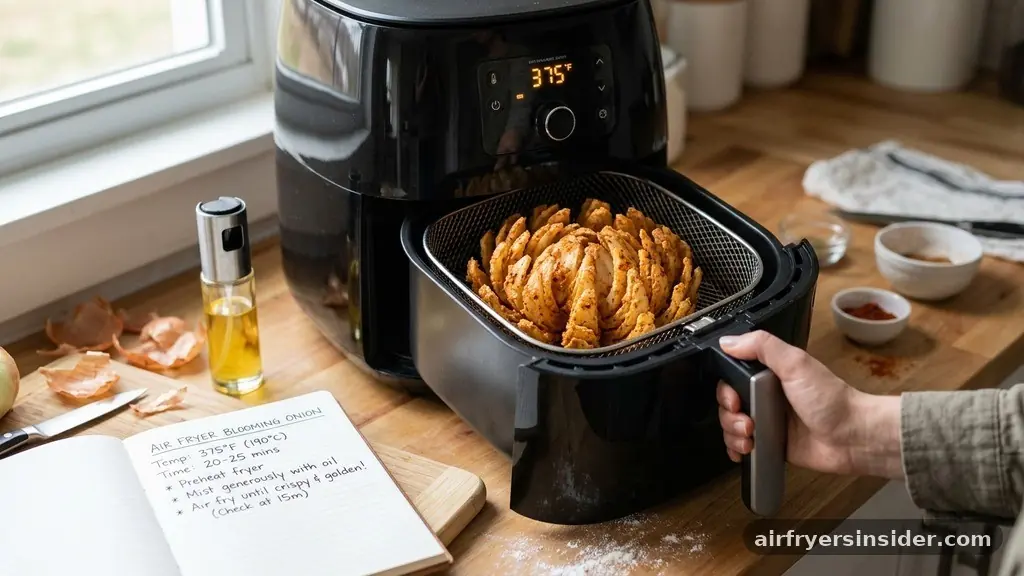
Cooking times can vary significantly based on the wattage of your appliance and the size of the onion. Generally, you should aim for a temperature of 375°F (190°C). Start by cooking for fifteen minutes, then check the progress.
The internal temperature isn’t the primary concern here, as we are looking for the right visual cues and texture. You want the petals to be tender enough to pull off easily, while the exterior remains rigid and crisp.
If the onion is browning too quickly before the center is cooked through, lower the heat to 350°F and extend the time. Conversely, if it isn’t crisping up, a quick spritz of oil and an extra three minutes at a higher temperature can fix it.
Always use tongs to carefully check the center petals; if they are still raw and crunchy, add more time. Remember that the onion will continue to cook slightly from residual heat once removed from the machine, so pulling it out just as it hits that perfect golden color is the right move.
Common Troubleshooting and Tips
Many home cooks struggle with the onion petals collapsing or the breading falling off during the cooking process. If you notice this happening, ensure your buttermilk soak is thorough and that you aren’t rushing the breading stages. Pressing the panko into the petals with your fingers rather than just shaking it on can help the coating stay put.
Additionally, if you are using an older air fryer, you might find that the bottom of the onion stays soft. To mitigate this, consider using a piece of perforated parchment paper designed for air fryers to keep the onion elevated.
| Issue | Potential Cause | Fix |
|---|---|---|
| Soggy Breading | Too much flour/moisture | Ensure excess liquid is drained |
| Onion won’t open | Root end too deep | Don’t cut through the root |
| Uneven browning | Airflow obstruction | Use a smaller onion or adjust basket |
Pairing with the Perfect Dipping Sauce
A blooming onion is essentially a delivery vehicle for a flavorful dipping sauce. The classic pairing is a creamy horseradish sauce, which cuts through the richness of the fried coating and the sweetness of the cooked onion.
To make this at home, combine high-quality mayonnaise, sour cream, prepared horseradish, a dash of ketchup, and a pinch of paprika. The acidity from the horseradish acts as a palate cleanser, making each bite feel light rather than heavy.
You can also experiment with other variations if you want to switch things up. A spicy remoulade, a honey mustard dip, or even a garlic-herb aioli can work exceptionally well. The key is to provide a sauce that has enough body to stick to the petals.
Avoid watery or thin sauces, as they will simply drip off the onion. Serving the sauce in a small ramekin directly in the center of the onion or on the side allows guests to customize their dipping experience.
Addressing Common Culinary Challenges
One frequent question is whether you can achieve the same results without using eggs. If you have an allergy or simply ran out, you can substitute the egg wash with a mixture of soy milk and cornstarch, or even just plain buttermilk. While the texture might vary slightly, these alternatives still provide enough tackiness to hold the breadcrumbs.
Another common gap in knowledge is how to reheat leftovers. While it is best served fresh, you can restore some of its original crunch by placing it back in the air fryer at 350°F for about four to five minutes.
Another point of confusion is the “blooming” action itself. If your onion isn’t blooming, it usually means the cuts aren’t deep enough or the core wasn’t removed properly.
The heat causes the onion layers to expand, but they need the space provided by the core removal to physically move outward. If you find the onion is too dense, try using a slightly smaller yellow onion, as the layers are often thinner and more pliable, making them easier to fan out during the cooking cycle.
Nutritional and Serving Context
While this dish is a treat, it is significantly lighter than the deep-fried version found in restaurants. Because you are using the air fryer, you eliminate the need to submerge the vegetable in oil, which reduces the total calorie count by a considerable margin.
Serving this as an appetizer for a group is a great way to enjoy a decadent snack without the heavy grease of a deep fryer. It pairs well with other finger foods or as a standout side dish alongside grilled proteins.
- Use a firm, large yellow onion for best results.
- Ensure the root remains intact to hold petals together.
- Apply a light layer of oil spray to ensure a golden crust.
- Allow the onion to sit for a few minutes before serving to let the coating set.
- Serve immediately for maximum crunch.
Frequently Asked Questions
How do I stop the petals from falling off?
The key is to ensure the onion is completely dry before applying the flour. Then, press the breading firmly into the petals rather than just dusting them. Allowing the onion to sit for five minutes after breading can also help the coating adhere better before cooking.
Can I make this ahead of time?
It is best to cook it right before serving, as the moisture from the onion will eventually soften the breading. If you must prep ahead, slice and soak the onion in the fridge, then bread and cook it just when your guests are ready to eat.
What if I don’t have buttermilk?
You can easily make a substitute by adding one tablespoon of lemon juice or white vinegar to a cup of regular milk. Let it sit for five to ten minutes until it thickens slightly, and it will serve the same purpose as traditional buttermilk.
Is it possible to use a red onion instead?
You can use a red onion, but be aware that they are generally smaller and have a sharper, more pungent flavor. The cooking time will likely be shorter, and the final result will be less sweet than a yellow onion. Yellow or sweet onions remain the best choice.
Mastering the Air Fryer Blooming Onion
Making a blooming onion in an air fryer is a rewarding culinary project that balances technique with simple, accessible ingredients. By focusing on the quality of your onion, the precision of your cuts, and the consistency of your batter, you can create a restaurant-quality appetizer that impresses your friends and family. The air fryer provides the perfect environment to achieve that satisfying crunch while keeping the dish manageable and relatively light.
Remember that the secret lies in the details—from the initial buttermilk soak to the final spritz of oil before it enters the basket. With practice, you will find it easy to customize the seasonings and sauces to suit your personal tastes, making this a go-to recipe for any occasion. Enjoy the process of creating this classic treat in your own home.